
Hi Everyone. I am so excited to be back with a NEW video tutorial. If you didn’t know, I’ve had the last few months off as I recently had a baby. Hendrix is now 5 months old and whilst I’ve been off I’ve been seeing some amazing bento cakes online. I knew I wanted to add my own to the Cakes by Lynz YouTube channel. So if you haven’t tried making a bento cake yet, you’ll find my tutorial below where I make 2 different kinds.

What is a Bento cake?
So what is a bento cake? Bento cakes or lunch box cakes got their names as they are individual miniature cakes which are presented in food boxes or as they are known in Japan; bento boxes. This cake trend first started with small 4 inch cakes being added into small bento boxes. This made the perfect individual treat. Over the last few months, this has evolved to the small cakes being added into cupcake boxes, along with some beautifully piped cupcakes.
In this tutorial I’m going to be showing you how to make both!
How to make a Bento Lunch Box Cake
Click below to watch step by step how to create your own bento cake ⇩
Bento cakes in a cupcake box
This cake was so much fun to make and you don’t need a special box to create it. This started out as a regular cupcake box with space for 6 cupcakes. You’ll see in the tutorial I cut the box to open up the space meant for 4 cupcakes to fit in a 5 inch cake. This gave me 2 spaces to add 2 single cupcakes. This really does make the perfect gift and it can be designed for any occasion, just by changing the message in the center.
As I mentioned, this cake was a 5 inch sponge cake which measured 2 inches in height. I actually baked half of my vanilla sponge cake recipe and cut my cake into 2 layers. This gave me the perfect sized cake for the cupcake box. The cake was then filled and decorated using my American buttercream recipe.
In the tutorial I go through how I achieved each colour of buttercream and which piping tips I used. I finished of the cake with the ‘Flamingo Fling’ sprinkles by Halo Sprinkles (you’ll find a discount code at the bottom).
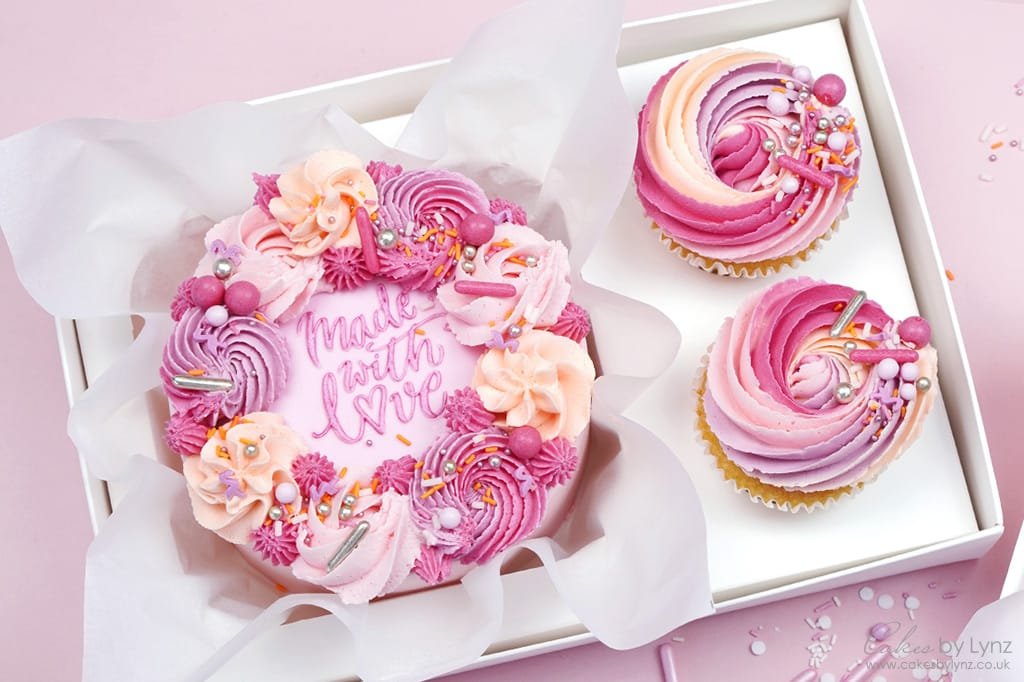
You can also see in the tutorial how I piped these chunky rainbow rosette swirls on the top of my cupcakes using the 1E piping tip.
Bento Cake Boxes
For the second Bento cake I create, this is a slightly smaller cake and measures only 4 inches. This really is the perfect sized cake for just one person and it fits perfectly into these cute cardboard food boxes I got from The Cake Decorating company.
Now 4 inch cakes are not a size cake I bake often, so I don’t actually have a tin for these. I baked a 5 inch cake and used a cookie cutter to cut it down. Alternatively if you’re making a few of these cakes you could bake a square cake and use the cookie cutter to cut out your layers.
I then used the 1M piping nozzle to pipe this pretty 2 tone buttercream border and finished it off with some ‘Tickled Pink’ Sprinkles, again by Halo Sprinkles.

Adding a personalised message with Sweet Stamp
Bento cakes are the perfect cake to let someone know you are thinking of them and a great way to personalise your cakes is with a little message on the top. In the video tutorial I show you 3 easy ways to create personalised messages. The first 2 are with the Sweet Stamp OutBoss stamps. These are pre-made designs which you can push into fondant, for a super quick and beautiful design. You can either paint your design or use the two tone method you see in the Happy Birthday example.


Another option is to use the Sweet Stamp letter sets to make your own message, just as I’ve done here with ‘Love you’. For this I used the Trendy and Timeless letter sets which are two of the smaller letter sets Sweet Stamp sells. These are the perfect size for a small message and also great for cupcakes too!
For this topper I used some blank edible paint and a really tiny paintbrush to paint inside the embossed letters. This does take a little more time than using the OutBoss stamps, but I always find it quite relaxing painting inside the letters.


Sweet Stamp Discount Code
I used lots of Sweet Stamp tools for these cakes and Sweet Stamp have kindly given me a 10% off voucher code to share with you. This can be used on any purchase made on their website, including the Halo sprinkles. To receive the 10% off all you need to do is visit their website sweetstamp.online and enter the code CAKESBYLYNZ at the checkout!
I had so much fun making these cakes and I really hope you enjoy the video and will find it useful if you want to make your own bento cakes.
If you haven’t already you can subscribe to my YouTube channel for more Free cake decorating video tutorials.
Tools I used
I have put a list below showing all the tools that I used throughout this video or if you would like to see all my favourite cake decorating tools just click here: https://www.amazon.co.uk/shop/cakesbylynz
- Lunchbox Bento Cake Boxes
- Olbaa Cupcake Box: Olbaa Cupcake Box
- SweetStamp Outboss Stamps (Use code CAKESBYLYNZ for 10% off)
- SweetStamp Trendy Letter Set (Use code CAKESBYLYNZ for 10% off)
- SweetStamp TimeLess Letter Set (Use code CAKESBYLYNZ for 10% off)
- SweetStamp Brushes (Use code CAKESBYLYNZ for 10% off)
- SweetStamp small pickup pad (Use code CAKESBYLYNZ for 10% off)
- Halo Sprinkles (Use code CAKESBYLYNZ for 10% off)
- Prop Options Acrylic Boards
- Turntable
- Acrylic Smoother Tool
- Wilton 1M piping tip
- Wilton 2D piping tip
- 1E piping tip
- 4B piping tip
- 6B piping tip
- Piping bags I use
- SweetStamp Pink Gel Colour (Use code ‘CAKESBYLYNZ’ for 10% off)
- SweetStamp Violet Gel Colour (Use code ‘CAKESBYLYNZ’ for 10% off)
- Edibleart Black Paint
~ Please note that some of links above may be affiliate links. If you click the link and purchase any item through that link, I will receive a small commission from the website but this does NOT add any additional costs to you. Thank you so much for supporting this blog x ~

5 Inch Bento Cake Recipe
Ingredients
For the Cake
- 6 oz Self Raising Flour (170g)
- 6 oz Room Temperature Butter or Baking Spread (170g)
- 6 oz Caster Sugar (170g)
- 2 eggs
- 1 tbsp Vanilla Essence / Flavouring
For the Buttercream
- 18 oz Icing Sugar (500g)
- 9 oz Block of Salted Butter (250g)
- 1 tbsp Vanilla Essence / Flavouring
- 2.5 tbsp Milk
Instructions
- Place all of the ingredients for your cake together in your mixing bowl.
- Mix these together until the ingredients are fully combined. This usually takes around 30 seconds.
- For this cake you'll need a 5 inch cake tin. My tins are 3 inches in height, so if your cake tin is not as high you will need 2 cake tins. I like to cover the inside of my tins in a thin layer of butter and dust with flour, before adding a circle of parchment to the bottom to stop the mixture from sticking.
- You then want to bake your cake for around 45 minutes on the middle shelf at 180 degrees Celsius. For my oven I use a normal oven setting. I don't actually use my fan oven when baking cakes as it tends to bake the cakes quicker on the outside so you get this hard crusty shell and the mixture is not baked all the way through.
- After 45 minutes you can take a cocktail stick or bamboo skewer and push this into the center of the cake. If it comes out clean you know your cake is baked all the way through. You can then place your tins on a wire rack to let cool for a few minutes before turning it out, and allowing to fully cool.
- To make your buttercream you will need to sift your icing sugar into your mixing bowl. To this add the butter, flavouring, and milk.
- Then mix your buttercream on a medium speed. After around 5 minutes your buttercream will start to go creamy. You can then add any gel colouring depending on the theme of your cake.
- When your cake has cooled, level off the top of your cake and divide into 2 layers using a serrated knife.
- You can then sandwich your layers together with some buttercream in the center. Use an offset spatula and smoothing tool to apply buttercream to the outside of your cake. With the rest of your buttercream, fill a piping bag with your favourite nozzle and pipe a border around the edge.
Plus why not save this tutorial for later and pin it to Pinterest


Leave a Reply