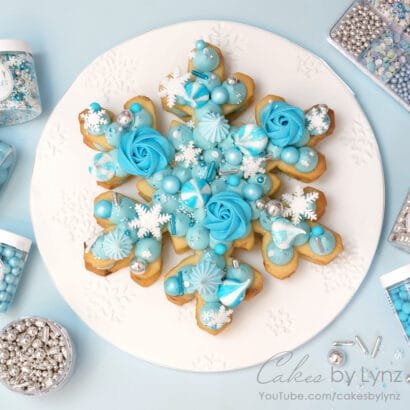
Giant Snowflake Sugar Cookie Recipe
Perfect for the festive season, this giant sugar cookie is a great alternative to a cake!
Ingredients
For the Cookie
- 200 g Butter (I used salted butter but you can also use unsalted)
- 200 g Caster Sugar
- 1 Egg
- 1 tsp Vanilla Flavouring (or flavouring of your choice)
- 360 g Plain Flour
- 60 g White Chocolate Chips optional
For the Buttercream
- 300 g Room Temperature Salted Butter
- 600 g Icing Sugar
- 3 tbsp Milk
- 2 tbsp Vanilla flavouring
- Blue Gel Colour
Instructions
- To make the cookie first download, print, and cutout the snowflake template. You can find the template here.
- Next add your room temperature butter into your mixing bowl, along with the caster sugar and cream together.
- Add the egg and flavouring. Mix these together on a slow to medium speed and add a tbsp of flour at a time, allowing the flour to absorb the butter as you mix.
- Once the dough has started to all come together, add your chocolate chips.
- Taking your ball of dough, roll this out onto a sheet of parchment paper. You want the dough to be around 5mm in thickness.
- With any excess, you can use this to cut out the second snowflake.
- Once cutout, place your parchment paper onto a baking tray and place in the fridge for around 30 minutes to 1 hour. This is to allow the butter in the mixture to firm up, which is going to stop the cookie spreading and will allow it to keep its shape.
- Place your cookie into a preheated oven at 180 degrees Celsius for around 15 minutes, or until the edges are starting to go golden.
- Once baked take out your cookie and allow them to cool.
- Place the butter, sifted icing sugar, flavouring, and milk in your mixer. Beat on a medium to high speed for around 5 minutes, until you're left with a creamy buttercream.
- Use food gel to colour your buttercream. I have used a small amount of blue.
- Pop your buttercream into a piping bag with your nozzle. I'm using a 1A piping nozzle. You can then pipe small domes over the surface of one of your cookies.
- Once covered, place your second cookie on top and cover with buttercream domes.
- You can then add any decoration you would like to the top. Click here to see how I made meringues for the top.